Sometimes, Google analytics code doesn’t work. No traffic is counted in the dashboard. A common issue is with the tracking code. Either, it’s not being parsed correctly or the server is causing the code to not work properly. Sometimes, due to addition of the analytics code in function.php, it doesn’t work well. The issue happens mostly with the websites using cache or some sort of minify script. Let’s learn the correct way to using Analytics on your WordPress blog.
A. Correct ways to use Analytics on your WordPress Blog:
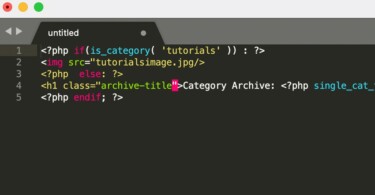
Before we start to troubleshoot google analytics code, let’s learn one popular and most used way to embed it on WordPres. We are going to use them editor and the following code would go to your functions.php, login to your dashboard and navigate to Appearance > Theme Editor.
Put the following code inside, as it helps you place your Google Analytics code without using any plugin.
// Adding Analytics Code in Head
add_action('wp_head', 'tow_add_googleanalytics');
function tow_add_googleanalytics() {
	echo '<script async src="https://www.googletagmanager.com/gtag/js?id=UA-*YOUR ID*-1"></script>
	<script>
	  window.dataLayer = window.dataLayer || [];
	  function gtag(){dataLayer.push(arguments);}
	  gtag(\'js\', new Date());

	  gtag(\'config\', \'UA-*YOUR ID*-1\');
	</script>';
Don’t forget to replace UA-*YOUR ID*-1 with your own google analytics ID. In order to obtain your ID, you need to login to your Google Analytics account. Navigate to admin and find Tracking Code.
The above placement resolves any error which might be present in your Google Analytics placement syntax. Make sure before above implementation, you have removed any other Google Analytics placement plugin.
B. Troubleshoot: Google Analytics Code on a WordPress Blog:
If you have placed your code using the above method, then it should work perfectly. Most of the times, the issue is in the placement. The analytics code doesn’t work properly due to its usage with PHP. Following are two methods to troubleshoot this issue.
1. Send some Test Traffic to your blog using Google Analytics
If you visit your analytics dashboard and navigate to admin area. Under the Tracking Info > Tracking Code, you would see your analytics ID and a button to send Test Traffic. Click that, and a new popup would open. Keep that popup open and visit your Real Time traffic dashboard. It would show traffic from the source analytics_test. In case it is not showing you same, then follow the next step.
2. Check the HTML of the WordPress Blog
The best thing is to visit any article of your website, or homepage. Right click on the page and click View Page Source. There, press CTRL+F and type in your analytics ID (UA-…). If you can find your analytics ID in the page source, then it shows that your code is showing correctly. Make sure the syntax of the code matches the one provided by the Google. There should not be any mistake, all the commas and inverted commas must be in the right place.
This is the best way to check for the analytics code in any webpage. Sometimes, after this check the analytics code is found to be full of error, or the PHP is not parsing the analytics code on the WordPress homepage. In both the cases, go to the part A of this article. After this method, the Google Analytics code would start working for your WordPress.
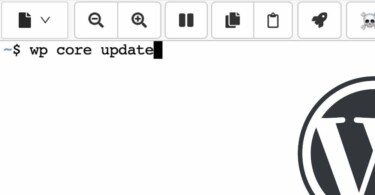
3. Disable Minification and Purge Cache
Sometimes minification of the javascript is the real culprit. If you are using some plugin to speed up your website, then make sure you add an exception for the Google Analytics plugin in the minification section. Further, also purge the cache so that any changes made to the code is visible on the website.
In W3 Total Cache, there is an option which allows minify to work for javascript. As a quick test, you can disable that option and purge every cache to check if the analytics code work now. Combine javascript into single file should also be disabled to check if the analytics code is being effected.
4. Disable Cloudflare Rocket Loader™ and other Javascript minify options
Another part of the troubleshoot and diagnosis is to disable any minification attempts by the Cloudflare. Further, you should also disable Rocket Loader™ in order to check if the Analytics code work. Don’t forget to purge the cache after making the changes.
One quick way to check if Cloudflare is doing any hanky panky with your website javascript is to enter Development Mode located inside Cache > Configuration. It disables any intermingling of your website with Cloudflare and allows you to test changes real time.
Bonus Tip: You can install analytics application from the Cloudflare. In that case, you don’t need to use the script provided by Google Analytics.
Conclusion:
The issue is with the placement. Once it’s resolved, the code starts working. One of the biggest issues with placement is the wrong use of PHP and broken syntax. Make sure you use the above provided code for the analytics placement in WordPress. Other times, cache plugins and javascript minification can cause troubles. Disabling cache and plugins one by one would help you find out the root problem.