There are some good content delivery networks in the market but you can’t evaluate everyone of those, so here comes the part of blogs to help you learn what is worth trying out of the bulk. A content delivery network gives a boost to your website and helps you to achieve a reduced load time of blog/website. Content delivery network is a must for those bloggers who are using some low quality hostings, since it is surely going to make their blogs load quite faster than before. Luckily! If you are on wordpress then you can try w3 total cache to reduce load time of your WordPress site along with a good content delivery network.
This article is going to teach you setting up cloudflare as a content delivery network for your blog. This is the ultimate noob guide to help you setup a free content delivery network account free of charge. You only need a blog or a website to get benefits from cloudflare. Cloudflare is a good content delivery network service and using it is also quite easy. Let’s start the steps to help you use cloudflare with your blog or website, as you wish!

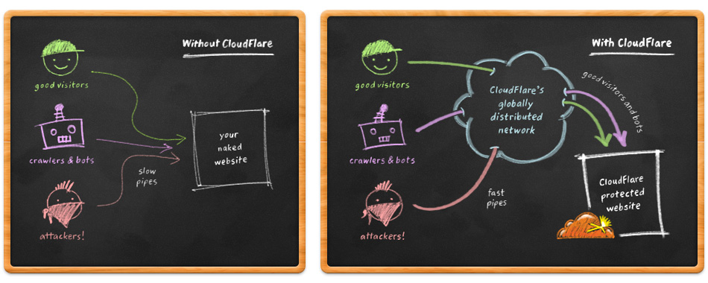
How Content Delivery Network Works – Specially Cloudflare:
A content delivery network is actually a gateway between the user and your website. In case of the cloudflare, the user opens the website powered by cloudflare. Suppose, he open website “Talkofweb.com”, now the name of the website is resolved to the IP address of the server through the DNS lookup. Cloudflare, actually makes webmaster use its own DNS servers. So, during the DNS lookup, cloudflare serves the static content of the website from the nearest possible server, making the request and load time small enough and ultimately reducing the website/blog loading time. It’s free for normal users and you can give a try.
Learn to use free content delivery network “CloudFlare” With your website/blog:
1- Signup with Cloudflare for a free account. You will just be needing an active email address for this step. After you have successfully made an account at cloudflare, now you need to login in order to add your website to content delivery network.
2- Now you need to add your website which you want to speedup using the cloudflare:

3- Click on Add website and you will be taken to an intro video. Just watch that while cloudflare scans your domain name server records.

4- After you press continue, you will be taken to the DNS entry section. Just check your DNS details, 99% of time cloudflare is never wrong in finding your server IP address which DNS resolves. But in some cases, if you have just changed your domain NS records seconds ago, the cloudflare fails to guess the IP, in this case wait for some hours to rescan using cloudflare or else add IP address of your server manually.
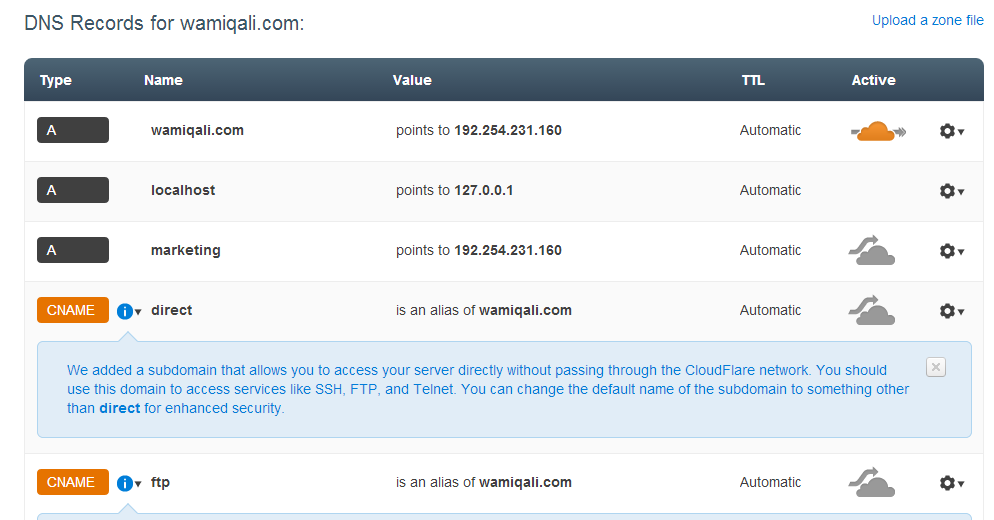
5- After checking DNS entries, just click “I have added all missing records, Continue“:

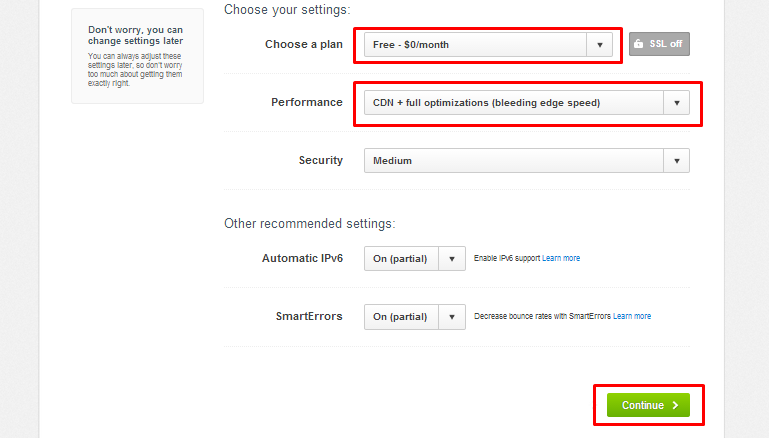
6- Choose your plan, select free at the moment. Choose Performance to be “CDN + Full Optimizations”:
7- Next you need to change your domain name server records which cloudflare will provide you in this step. Remove the previous records from your domain which we commonly call as NS records. Since, cloudflare has added your DNS entry into it’s system. Now you just need to use cloudflare’s provided DNS in order to route your traffic through cloudflare. (Cloudflare provides different DNS for different clients, so don’t forget to use yours, not the one shown in screenshot)
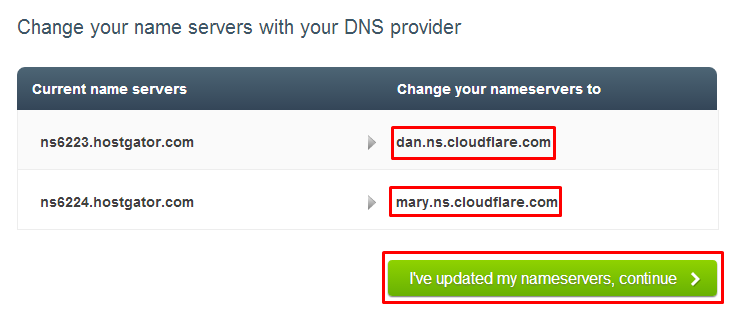
8- Just click “I’ve updated my name servers continue” and you are done adding your website to cloudflare. Now, all of your traffic will be loading resources through the cloudflare server making your wordpress/site load in a matter of no time.
Purging Cache in Cloudflare to Update your Visual Changes to Website/Blog:
Since cloudflare keeps a cached copy of your every static resource, therefore any changes done to the css file of your website or any other static resource will not be visible, because cloudflare will still be serving the old copy through its cached system. Thus, a little note for developers, if you have updated anything in your website then purging cache is a must, to serve the latest files to the visitors.
How to: Purge Cache:
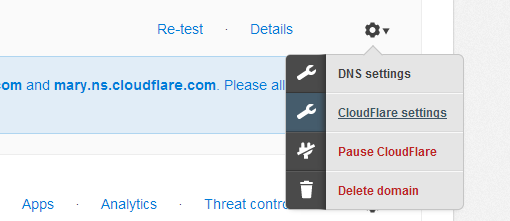
In Order to purge cache, you must go to the home of cloudflare. Drop down options for the domain you want to clear the cache. Open cloudflare settings and there you will find “Purge Cache” button. Just click that to refresh and rebuild your cache with updated files. Options for the domains can be found like this:
Development Mode for Real Time Updates and Pausing Cloudflare:
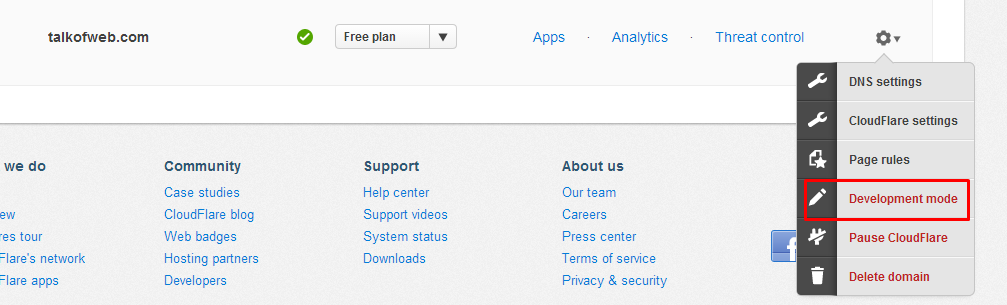
In the same drop down options, next to the domain name in cloudflare dashboard, you can also turn on development mode. This will allow you to make changes live in realtime by pausing cloudflare. But to be on safe side, once you turn off development mode of cloudflare after desired changes, again purge the cache. You will find development mode in the same menu as above:
Some Worth Sharing Cloudflare tactics:
- One more important thing, if your site doesn’t work well with the javascript, then go to cloud flare settings and make sure that “Rocket Loader” is turned off, its a relatively new technology implemented by cloudflare which often creates problems for sites.
- Also make sure that minification is also turned on for HTML, CSS and Javascript, since it will reduce the load time of website to quite an extent.
If you need any sort of help, then kindly ask that in the comments, I shall try my best to get your answer.
i always get problems with cloudflare my site is sometimes not viewable in Pakistan when i use cloudflare
Thanks for the information brother. please help me to configure SSL settings.
What kind of problem are you facing?