Windows is not bug-free and often due to certain issues, it gives errors. Most of the times you can resolve such errors. One such error occurs during windows update with code number 0x80070422. An error code has a purpose to help you find the root cause of it. This particular error just stops the entire update process. Now, system updates are necessary, therefore, solving 0x80070422 is important. There are certain security and system performance updates that are critical to the overall computer’s health. It’s because of the following reasons that Windows 10 throws windows update 0x80070422 error:
- Pending Windows updates for your system didn’t install correctly.
- Internet connection wasn’t stable and caused frequent packet loss.
- Non-availability of the expected storage space.
- Conflict in the attached peripherals (Remove connected devices and restart).
- No system restart in a long period of time.
- Software glitches such as windows services issues.
Once one of the above conditions is met, the Updates panel throws the error in the following words:
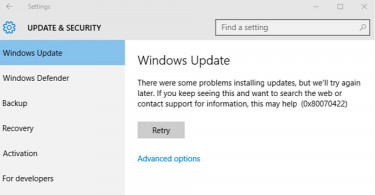
There were some problems installing updates, but we’ll try again later. If you keep seeing this and want to search the web or contact support for information, this may help: (0x80070422)
Solve Windows Update Error (0x80070422) In Five Ways:
The below-presented solutions will cause this error to go away. The reasons which are given earlier are also mini-solutions to this error, for example, changing internet connection and restarting your computer helps.
1. Restart Update Service:
Windows Update is a separate service which runs when you start you computer. You might have disabled the service by mistake or it might not be running properly. As a result, you should restart the service. Follow these steps:
- Run Task Manager and in File > New Task type
services.msc; hit enter. - A window will pop-up showing you details of the currently running services. Scroll down and find Windows Update; Double-click it.
- In the General column you should make sure that the Startup isn’t disabled. You must set it to Automatic.
- Under Service Status click Start. Hit OK and exit.

In most cases, restarting update service will solve any errors which might be stopping your system from self-updating itself.
2. Restart Services Related to Windows Update:
There are certain services which are essential for Windows update to run properly. In the same window, as in first solution, make sure to find these related services and stop/start them, which equals restarting these services. Following are the services related to Windows update:
- Update Orchestrator Service (It’s responsible for downloading updates for the operating system and installing them after verifying)
- Background Intelligent Transfer Service (Used by Windows for transfer of files in the background from an HTTP server)
- Windows Defender Firewall
- Network List
- Application Identity
- Cryptographic Service
- BitLocker Drive Encryption Service
You’ll have to restart these services and make sure that their start routine is set to Automatic. All the above-described services are used at some point when your system attempts to update itself. Therefore, making sure that none of these services throws an error is a necessary step.
3. Check Registry Entry for Windows Update
Your computer registry must have proper settings to let Windows update work efficiently. All the entries must be correct. You must first backup registry before you make any changes. In order to check that your registry is in working condition, follow these steps:
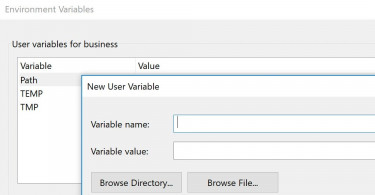
- Start Task Manager and like earlier create a new task
regedit; hit enter. - A new window will launch showing you registry settings of Windows 10. Go through HKEY_LOCAL_MACHINE > SOFTWARE > Microsoft > Windows > CurrentVersion > Windows Update > Auto Update.
- Find EnabledFeaturedSoftware and change the value to 1 by double-clicking the entry.
- Find Start and change its value to 3 by double-clicking this entry.
- Restart your system after making the changes.
If the values of these entries is same as mentioned then you don’t need to make any changes.
4. Check your Internet Connection IP Address
If you’ve enabled IPv6 internet settings then revert to IPv4. It’s right that IPv6 is the latest technology, however, some devices are not well configured to use this protocol. Furthermore, its adaptation by some network providers is not fully followed. Therefore, it can cause network issues in certain cases. You can disable it by the following process:
- Open Start Menu in Windows 10. Go to Windows System > Control Panel > Network and Sharing Center. Click on Ethernet or Wi-Fi as shown in the screenshot.
- Click on Properties, Scroll down and untick Internet Protocol Version 6. Restart your system and IPv6 should not cause troubles.

Make sure that the IPv4 protocol is checked and you have not disabled it accidentally in the same window.
5. Troubleshoot Windows Update through Windows 10 Utility
Windows 10 offers a built-in troubleshooter to solve issues related to the update. You can run this to find solutions to the most common issues. It checks for almost every bottleneck which might cause a hurdle to the update process and reports you the possible solution. Follow these steps to run troubleshooter:
- Open Start Menu and Go to Settings > Update and Security. Scroll down and click Troubleshoot.
- Find Windows Update in the sidebar and click it.
- Click Run the troubleshooter button to start the process.
After following the steps of the troubleshooter you will easily solve the error.

Conclusion:
The above mentioned procedures will help you solve windows update 0x80070422 error. Solving this error is crucial and if nothing helps then repairing your windows is a good option. However, the above mentioned five to seven solutions will easily help you with this error and your update will work fluently.