Finder lists varying files and directories allowing you to browse them with ease. However, inside the organised file structure of finder, certain directories/files are hidden. MacOS hides these files and directories for sake of system security and integrity. However, certain times you’ve to hide/unhide a certain directory for example ~/Library folder is one of those directories hidden by default which you can access.
Unhide files and folders with keyboard shortcut
One of the smartest ways to unhide files/directories is using a keyboard shortcut.
- Open Finder and go to the directory having hidden files like Home Directory.
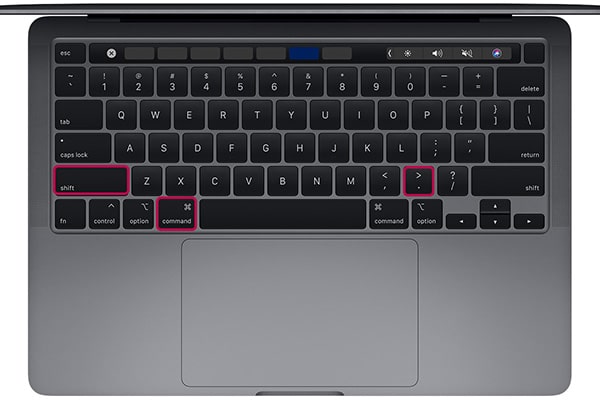
- Press Command + Shift + . (Dot) and instantaneously all files and folders will appear inside the Finder.
Again pressing the same combination of the keys will hide those files/directories.
Unhide files and folders with terminal
Suppose, for some reason macbook’s keyboard has sticky keys and the required shortcut isn’t working. Then you can use terminal, follow the procedure:
- Open Terminal and use command defaults write com.apple.Finder AppleShowAllFiles true and hit enter.
- Write another command killall Finder and hit enter, this will quit Finder.
Open Finder again and this time you’ll see that all hidden files are visible. Additionally to hide files/directories using terminal, follow this:
- Open Terminal and use command defaults write com.apple.Finder AppleShowAllFiles NO and hit enter.
- Use another command killall Finder.
This will again hide the files and directories with hidden flags inside the Finder and Apple system.
Hide a new file/directory in Finder
Suppose, you have created a new directory or file in Finder. Now you want to hide this particular folder or file. Then follow this procedure:
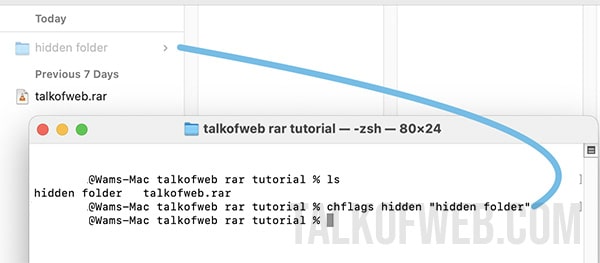
- Open Terminal on macOS and type chflags hidden /FOLDER_PATH and hit enter.
- Enter killall Finder and hit enter. This will close Finder.
- Open Finder and go to the directory where you’ve placed hidden file/folder and it’ll not show it unless you press the required keyboard shortcut as shown in the first step (command + shift + dot).
Incase, you don’t know the /FOLDER_PATH then simply use CD command to go to the required folder and then type in the file/directory name, along with the chflags command, which you want to hide.
Additionally, to give the path of the file/folder you can also drag it inside the terminal and macOS will automatically copy paste the path.
Furthermore, incase you want to unhide a particular file or folder permanently inside macOS then use the following procedure:
- Open Terminal and write chflags nohidden /FOLDER_PATH and hit enter.
- Use another command killall Finder.
- Reopen Finder and you’ll notice that the file/folder isn’t hidden anymore.
Conclusion
You can show hidden files and folders in macOS using keyboard shortcut or terminal command. Additionally, you can also hide/unhide a newly created folder or directory inside macOS using terminal command chflags. Learning to handle hidden files and folders will give you more knowledge about macOS structure and file system.