So, there happened to be some speed issues with one of our client websites. It was using cloudflare. SSL certificate was activated. The client was using a self-signed certificate on the server side, whereas the Cloudflare handled the browser side. Pingdom tools measure the Time to First Byte, as well as the time required for an SSL Handshake. Therefore, a faulty SSL Certificate can increase your page load time, thus reducing the page speed. After handling different cases of slow page speed with regards to SSL Certificate, here are some tips which you should consider while using HTTPS on your WordPress blog.
Good SSL certificate & HTTPS Techniques to ensure fast page Speed Time
If you are using HTTPS on your blog, then make sure you follow these guidelines and keep a constant check on your page load time.
1. Check HTTPs latency using Pingdom Tools
Pingdom Tools is a good website which can be used to check the HTTPS latency. You need to put the url of the page for which you want to check the HTTPS speed response. After some while, the Pingdom Tools would prepare a report.
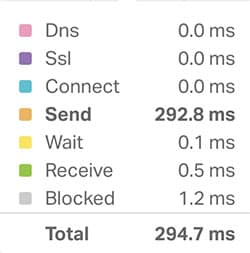
The important section is the waterfall section, one with different colours. It shows the response time of various parameters like TTFB, SSL or DNC etc. Look for the SSL Time, it should not be more than 20ms or below. If it’s contributing a large amount of time to the page loading, then it’s time that you start checking your SSL configuration for the website or blog.
2. Make sure your Server Certificate is not Expired
The server side, self-signed certificate which often webmasters use, can be expired. Although Cloudflare masks the expiry date through a new certificate served to the visitor browser. Still, it’s not a good practice to use an expired certificate. Immediately, go to your SSH Terminal and create a new SSL Certificate and Sign it through OpenSSL. Make sure you increase the number of days for the validity of the certificate.
Incase you don’t know how to create a self-signed SSL Certificate, follow our Guide; How to: Create Self-Signed SSL Certificate and use HTTPS
Note: Browser throws an error in the case a certificate is expire; however, if the website uses a CDN like Cloudflare, no error appears.
3. SSL Chain should be as short as Possible
The main SSL Certificate of the server is appended with a browser verified certificate, which is normally a provider whom the browser trusts. The certificate chain is a term which means a list of certificate which contains SSL Certificate and the Certificate Authority certificates. The later is responsible for allowing the browser to verify the website as trustable.
Now, if this chain is pretty long, the size of the certificate signed by the certificate authority would also get large. It would add to the page load time; therefore, it’s advisable to keep the chain as small as possible. In order to check the certificate chain, you can click on that secure lock present on the left side of your Chrome browser address bar. Once you click it, open Certificate. There you would see your certificate chain. Other way is to go to your Apache configuration and look for SSL Certificates. The latter method can be learned by following the tutorial mentioned in Part 1 of this guide.
4. Use common SSL Configuration Settings for Server
Well tested SSL Configuration is a good start. One of the commonly known good settings in the ssl.conf include enabling SSL Cache, Faster SSL Protocol Order and OCSP Stapling. However, keep in mind that you should continuously check your SSL latency using a page speed tool, after every change in configuration and subsequent server restart.
The above settings can be read through the documentation of the type of server you are using. In case you are using Apache, then its documentation on mod_SSL can be read. For example, for a faster SSL Protocol order, the following configuration can be used:
SSLProtocol all -SSLv3
SSLCipherSuite ALL:+HIGH:+TLSv1:!ADH:!EXP:!SSLv2:!MEDIUM:!LOW:!NULL:!aNULL
SSLHonorCipherOrder on
Similarly, for OCSP Stapling, the following configuration can be used:
SSLUseStapling on
SSLStaplingResponderTimeout 5
SSLStaplingReturnResponderErrors off
SSLStaplingCache shmcb:/run/ocsp(128000)
In order to understand the above configurations, and to be able to diagnose any resultant errors, one should be able to understand, how SSL Handshake works. Similarly, in order to understand, the way to add these configurations, make sure you learn the tutorial linked in Part 1 of this guide.
5. Remain liberal on Generic URLs and strict on Specific URLs
You can use SSLCipherSuite in order to remain liberal on some general URLs, as it would save time for the verification and encryption process. Apache mod_ssl provides a configuration option for stronger ciphers to a particular URL, whereas generic ciphers for a general url.
#Liberal Configuration for General
SSLCipherSuite ALL:!aNULL:RC4+RSA:+HIGH:+MEDIUM:+LOW:+EXP:+eNULL

<Location "/safe/area">
#Strong Ciphers for a Specific Safe URL
SSLCipherSuite HIGH:!aNULL:!MD5
</Location>
Part 4 of this guide, shares a liberal Cipher order, whereas this part shares another liberal Cipher order along with a location specific stronger Cipher order. Obviously, ever execution has a different time requirement, depending on the encryption available on the client side.
Note: Cipher means an algorithm or system for data encryption. Examples are DES, IDEA, RC4, etc.
Conclusion:
Similar to the above certificate related solutions and the direct server related solutions, there are other solutions available in order to speed up SSL handshake and HTTPS page load time. However, it’s worth noting that you find a balance between security and page speed. Those areas of the website which require greater encryption, like a WordPress eCommerce portion, then you should not compromise on security to enhance page speed. Certificate related solutions and better SSL Cache can be utilised for sake of increasing page speed, instead of having a liberal SSH approach.