This is really important that how your posts appear at your blog. Like how you place the thumbnail for the posts and how you show summary for the posts. Today! I’ll explain you that how can you customize your WordPress post loop. Like how can you change the appearance of how the posts show up at the home page or at any area of your blog. It’s fairly important that you show some eye catchy posts to the public so that they may click the precious content which you write for them.
You should know that how WordPress post loop work and for this you need to read: WordPress posts Loop explained in detail
Customize the appearance of WordPress post Loop:
It’s easy now as your understand the major components of a loop. But previously I have posted a very basic version of the WordPress post loop which contains featured image, posts content, title and the date posted. Today, I’ll show you that how can we make the traditional beautiful WordPress posts loop. Developers will take this guide as interesting. I’m going to cover the following things:
- Post Title
- Featured Image
- Post Meta
- Read More Link
- Comment Link
I hope that you have installed the WordPress at your computer using the xampp. After this you will need to navigate to the WordPress themes directory in the wp-content. If you want to carry on with your own theme then it’s good but at the end of the post I have also provided the sample files where I have created and customized a wordpress loop at my own. It’s good to learn new things by experimenting so go on what you may like.
1- Determining the Placement of the Elements in the WordPress Loop:
Suppose you want to move the position of the elements in the posts loop at the wordpress. You will need to alter some code. Like you need the positioning like this:
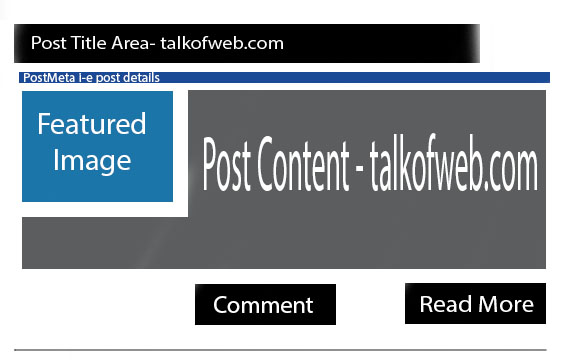
We can make this simple arrangement happen by keeping in mind the following things:
Place the coding of above elements in the respective manner as shown in the image. i-e
- Post Title PHP code for WordPress
- Post Featured image or thumbnail code for WordPress
- Post Content PHP code
- Read More and Comment links code
After you have these required codes you can learn how to stye the wordpress post loop accordingly. Here is my snap shot for the code, first see this and then I’ll move forward to give you code for all the elements placed in the same order to make the placement in above image happen.

This is the code for the arrangement which I have shown in the image above this image. Now here comes the coding part below, I’ll be explaining it step by step that how can you customize your own WordPress post loop:
<div id="content">
	<!-- the loop -->
		<?php while ( have_posts() ) : the_post() ?>
		<div id="post-<?php the_ID() ?>" class="post">
		<!-- the title -->
			<h2 class="post-title"><a href="<?php the_permalink() ?>" title="<?php the_title() ?>" rel="bookmark"><?php the_title() ?></a></h2>
				<!-- the meta -->
			<div class="post-meta">Posted on <?php the_time('F j, Y'); ?> in: <?php the_category(', '); ?><span class="sep">|</span><?php comments_popup_link('Post Comment', '1 Comment', '% Comments') ?></div>
			<!-- the thumbnail or feautured image -->
			<?php if ( has_post_thumbnail() ) ?>
        <a href="<?php the_permalink(); ?>" title="<?php the_title_attribute(); ?>" >
          <?php the_post_thumbnail();?></a>
			<!-- the content -->
			<div class="post-content">
				<?php the_content('Click here to read more »'); ?>
			</div>
		</div><!-- .post -->
		<!-- the end -->
		<?php endwhile ?>

		<div class="navigation">
			<div class="navleft"><?php next_posts_link('« Older Posts', '0') ?></div>
			<div class="navright"><?php previous_posts_link('Newer Posts »', '0') ?></div>
		</div>

	</div><!-- #content -->
2- Explanation of the WordPress post loop code:
First things which wraps the whole posts loop is the “content” it’s an id given to the division in which you have placed the posts of your blog.
Second thing is the start of the loop to call the posts of your blog. I have commented it out as the “the loop”. The loop has started here and now you need to call the contents of a loop. You can control the number of the posts in the loop from the settings of your blog.
Third part is the call of the post title. I have commented it out as the title and the next part calls for the meta of the post. Like the category of the post and the time of the posts at which it has been published. Along with that is the comment URL. I’ll be moving it below later So you may come to know that how to place elements.
Later on we can see that there is the code to call the featured image and after that the content of the post has been called thus this is the last part of the post loop and now the loop has to be ended using the endwhile.
Thus after there we can call the navigation for scrolling through the posts. Older and new wordpress posts. This code will echo the buttons for navigating the posts.
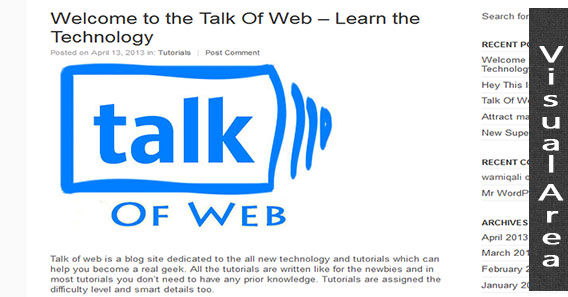
3- Visual output of the wordpress post loop code so far:
Here is the visual output of the above code:
4- Changing the appearance of the wordpress post loop using CSS:
We need to make the layout look like this:
CSS here comes into the play, all the things are working fine so far and now you need to place the elements according to the above image. Always be sure that you make the visual output of the thing which you are going to design. If you have a blueprint then it’s an easy job to be done.
1- You need to float the image of thumbnail to the left. When you will float it to the left using the CSS then content of the post will automatically float to the right.
2- To add some visually beautiful elements you will need to style the elements using CSS. CSS of a wordpress theme is located in the style.css in the theme directory of the WordPress.
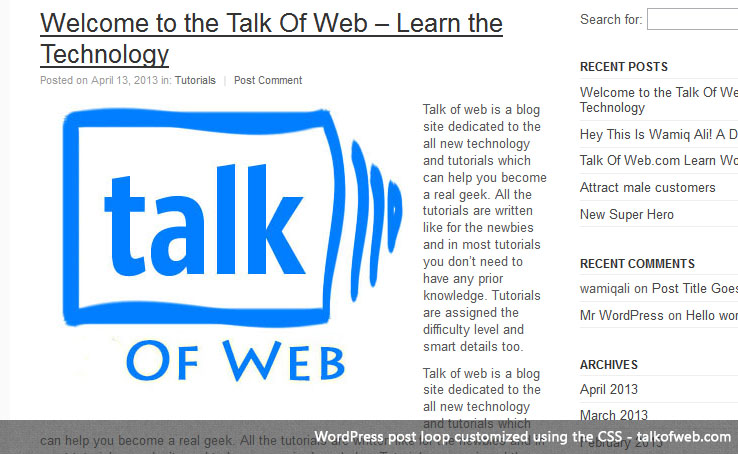
Floating the thumbnail of the WordPress post loop to the left:
I have added a div id thumbnail to the thumbnail and then have floated it to the left using the CSS. Here is the modified code for the thumbnail or featured image with added div:
<!-- the thumbnail or feautured image -->
			<div id="thumbnail">
			<?php if ( has_post_thumbnail() ) ?>
        <a href="<?php the_permalink(); ?>" title="<?php the_title_attribute(); ?>" >
          <?php the_post_thumbnail();?></a>
		  </div>
After this here is the code added to the wordpress style.css file in the theme directory to make it float left using the ID given to the div of the thumbnail.
#thumbnail {
	float: left;
	margin: 10px;
}
This code will make it float to the left and text to the right like this:
Now you need to make the image size to be small too, you can do it with CSS but the more good part is to be done it with the help of hard cropping using the functions.php file in the theme directory of your wordpress theme. But today i’ll show you the CSS way to do it. The thumbnail added will have the maximum resolution but you can control the width and height of the image using the CSS.
You will need to add the following code to the wordpres style.css file:
#thumbnail img {
	width: 200px;
	height: 200px;
}
After you have added the code, refresh the localhost wordpress version at your laptop or pc and then see the change in the action. Using the above code you have selected the img element in the thumbnail id div.
5- Adding Read More and Comment link to the WordPress post Loop:
I haven’t added the read more and comment link in the end of the post loop, you can do this by calling the link of the post in the read more button and doing same with the comments too, i-e calling the comment div link. Add the below code to the end of the loop just before the endwhile(); i-e closing of the loop.
<div id="readmore-bar">
<a href="<?php the_permalink(); ?>">Read More</a>
<a href="<?php comments_link(); ?>">Post Comment</a>
</div>
After you have added the code, you need to style the links of the read more and comment using the CSS. Add the following code to the style.css of your wordpress template.
#readmore-bar {
width: 100%;
overflow: hidden;
}
#readmore-bar a{
float: right;
margin: 10px;
padding: 10px;
background: #ccc;
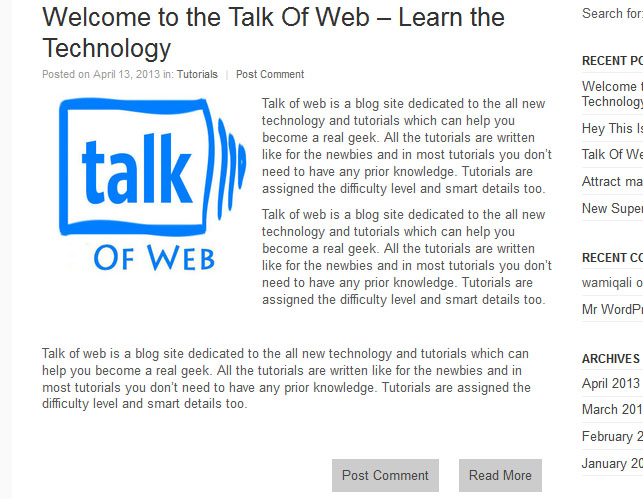
}After you have added the code and the modified version of loop is functioning well then the output will be like below!
Final WordPress post Loop with customized look and Final Ultimate WordPress post loop code:
This is the final code for the loop and is customized with the css added previously as shown in the post!
<div id="content">
	<!-- the loop -->
		<?php while ( have_posts() ) : the_post() ?>
		<div id="post-<?php the_ID() ?>" class="post">
		<!-- the title -->
			<h2 class="post-title"><a href="<?php the_permalink() ?>" title="<?php the_title() ?>" rel="bookmark"><?php the_title() ?></a></h2>
				<!-- the meta -->
			<div class="post-meta">Posted on <?php the_time('F j, Y'); ?> in: <?php the_category(', '); ?><span class="sep">|</span><?php comments_popup_link('Post Comment', '1 Comment', '% Comments') ?></div>
			<!-- the thumbnail or feautured image -->
			<div id="thumbnail">
			<?php if ( has_post_thumbnail() ) ?>
        <a href="<?php the_permalink(); ?>" title="<?php the_title_attribute(); ?>" >
          <?php the_post_thumbnail();?></a>
		  </div>
			<!-- the content -->
			<div class="post-content">
				<?php the_content('Click here to read more »'); ?>
			</div>
			<div id="readmore-bar">
			<a href="<?php the_permalink(); ?>">Read More</a>
			<a href="<?php comments_link(); ?>">Post Comment</a>
			</div>
		</div><!-- .post -->
		<!-- the end -->
		<?php endwhile ?>

		<div class="navigation">
			<div class="navleft"><?php next_posts_link('« Older Posts', '0') ?></div>
			<div class="navright"><?php previous_posts_link('Newer Posts »', '0') ?></div>
		</div>

	</div><!-- #content -->
Below is the output of the above code when customized with css:
Why not try some innovation using the CSS3 and add some shadows to the elements.


Greetings. I’m in the process of moving my site from WordPress.com to WordPress.org. My site cairnslife.WordPress#com uses a theme that was no good as a .org theme. See how my posts display in columns and grids? Can you please provide me with instructions how to do this on a WordPress.org theme?
I can’t see posts in columns and grids, I just understand that you want your org blog to look alike .com blog, please elaborate more 🙂 So that I may get and help you out!
Thankyou!